Disclaimer: I do not possess a Ph.D. nor am I omnipotent. I do not know all things and I'm rarely perfect in the things that I think I know. I'm a self-taught potter, naturally curious and observant. The information that I share is a combination of my research and my observations. Please evaluate it within your own bounds of common sense and consider its application to your situation.
I'll begin sounding like I'm rambling, but I wanted to share why I'm blogging in this thought direction. You see, besides pottery, I also own a mini farm. I have begun working with pygora goats. They are a specialty breed of fiber goat. I already own 2 little girls whom I purchased from a farm that I could personally visit. For a variety of reasons, I have decided that I want to purchase additional goats from another source. While doing my research, I discovered that my next set of goats will have to come from a greater distance which would be inconvenient or impossible to visit. Originally, I was not comfortable purchasing my little ones (they are very expensive and require a lot of personal devotion) without first seeing the farm from which they came. How could I know the quality of care? How would I be sure that they didn't have health problems? How could I know what the parents were really like? How could I trust the farm if I couldn't see it? Then I found a website that shared everything about their farm. It was so detailed that I felt like I had visited the farm first. It is a great distance from me (about 3 days drive), but I feel so good about the information that I obtained online that I'm willing to make the investment in time, money, and care.
How does this relate to pottery? Well, I scroll through the pottery on Etsy, and with the extensive knowledge that I have regarding what I consider to be safe and suitably-made pottery, I question to myself if I want to invest my money in that lovely-appearing-but-maybe-not-suitably-made piece of pottery. There may be nothing wrong with that pottery, but it's hard for me to judge just based on a few pics and the limited (not technical) information in the description. Handmade pottery is more expensive and quality pottery deserves to be more expensive. But how do I know for sure that piece is quality? How do I know it is fully vitrified and water-tight? Can I be sure the glazes won't leach? What about shivering and crazing? Without actually seeing, touching, and asking the technical questions, how can I trust that pottery?
This is why I want to blog more about my pottery in detail and with some technical information. I want to reassure you that my pottery is safe and suitably-made. I want you to understand more about the clay and the glazes as well as eventually sharing my techniques in greater detail. I want you to visit my blog and feel like you have visited my studio. I want you to get to know me, my attitude, my considerations, my cautions, my thought processes...everything! And, most importantly, I want you to feel confident that when you purchase one of my pieces of pottery that it is a safe, suitably-made, quality piece of pottery. I want you to feel good about buying from me.
Please check out the new page tabs across the top of this page. Here you will find more information about pottery in general and my pottery specifically.
Jarita's Creations Handbuilt Pottery with an Earthy Theme
Thursday, October 7, 2010
Saturday, July 31, 2010
Continuing Kiln Successes (& some not-so-successes)
Well, I never finished sharing about my last firing and Friday, I opened the kiln to more wonderful treasures! I am very pleased with the direction that my work is going right now.

 To begin with, I have completely finished 2 of those necklaces that I have been working on forever. I still don't have them listed on etsy yet, but I'll add them soon. I really like the way this pendant worked into the necklace. I utilized Delica seed beads and wove the strands through the artbead and created a lovely branching effect that works really well with the overall piece.

 I finally finished the triangular pendant into a sweet necklace also. The peachy-pink tones worked perfectly with this beadwork necklace that I made. The spiral effect in the necklace also compliments the twisted coils of clay in the pendant. I really love the finished piece!

 The next series had some good results too, but also some bad results. I definitely like this ornament, but the results were not what I was hoping for. I applied sbred slip and then the dark green underglaze on the leaves only. I then applied a glossy glaze on the leaves hoping it would protect the green from burnout, but it didn't. I also applied a little copper carb/rutile mix over the top 3 leaves (that's why they still show some green). I honestly like the results. I love the way the dark veins show through the minty green leaves. Nice depth and detail. I even like the way the background leaves lack the green color. It looks like shadows and highlights. Nice contrast.
 The next ornament in this series of tests had my favorite dark green underglaze, a dark brown underglaze, and a buttercup mason stain. Then I glazed the whole thing. Umm, no good. I do not like the results at all. This one will go in the shatter pile. I applied the glaze a little too thickly, but I think the main problem actually was with the cooling of the kiln. I slowcooled really well and that allows crystals to develop within the glaze. Depending on the exact glaze, sometimes the glaze turns a softer matte tone, sometimes large flower-like crystals develop, and other times it does as it did here. Partly due to the heavy application, it developed a heavy frosty appearance that obscured details. Not to my liking.
 This ornament has the same underglazes applied, but I did not apply any glaze, just fired it dry. I really like it like this. It's hard to tell in the pic, but the frame is done in the dark brown underglaze and I used the buttercup mason stain on the vine. Although there is only a subtle difference, I like the way it adds just a touch of depth and color.
 I did a similar experiment as the ornaments above with these two pendants, except my contrasting color was a cobalt/frit mixture. You can still see the frosting effect and a little loss of detail on the glazed pendant, but because the application wasn't quite as thick, the final effect is a little better. I still like the unglazed pendant better, but I can work with the glazed one too. It's nice and different. I probably won't be using this glaze on a slow cool on small items anymore.
 For now, I just want to share one more item. I really love this ornament! It is one of my favorite pieces from this firing. I have applied a combination of succesful effects to create an overall beautiful ornament. I applied sbred slip (and washed back) all over. Then I carefully applied the cobalt/frit mixture to the ribbon and bow. Next, I glazed the leaves and applied copper carb/rutile mix to them. The results include lovely accented veins showing through the minty green leaves. Also, the ribbon and bow exhibit the soft-glaze effect that I have mentioned in previous blogs caused from the frit reaching the melting point and becoming glaze-like.

 To begin with, I have completely finished 2 of those necklaces that I have been working on forever. I still don't have them listed on etsy yet, but I'll add them soon. I really like the way this pendant worked into the necklace. I utilized Delica seed beads and wove the strands through the artbead and created a lovely branching effect that works really well with the overall piece.
 I finally finished the triangular pendant into a sweet necklace also. The peachy-pink tones worked perfectly with this beadwork necklace that I made. The spiral effect in the necklace also compliments the twisted coils of clay in the pendant. I really love the finished piece!
The last firing included lots of ornaments and beads with some new finishes. This firing I continued the effects that I liked and expanded the tests for additional possibilities. Some of the tests were great, some, though, not-so-great. Once again, there is so much to talk about, that I probably won't get it all shared, but will share what I can.

First of all, I talked about the tendency for my favorite green underglaze to burn out...so, I tried some experiments on little beads. The first oak leaf was finished with dark green underglaze and sbred slip. The green burned out, as was expected. I have a nice bead in shades of very olive and a reddish brown. Nice, but not what I want all the time. The next little bead shows the same underglaze by itself. Very pretty summertime color, but I'm still looking for more options. The next bead was hard to photograph well, but on it, I applied a different underglaze, Amaco hunter green, and brushed just a touch of the sbred slip on it. Beautiful! No color washout and nice late-summer/early-fall tones! The last bead shows that same underglaze by itself, where I think it exhibits a touch more blue undertones. I think it's workable, but I also think the original dark green has its uses provided I don't mix it with iron. Very interesting experiments that have really broadened my color palette as each shade will have its time to shine.
 The next series had some good results too, but also some bad results. I definitely like this ornament, but the results were not what I was hoping for. I applied sbred slip and then the dark green underglaze on the leaves only. I then applied a glossy glaze on the leaves hoping it would protect the green from burnout, but it didn't. I also applied a little copper carb/rutile mix over the top 3 leaves (that's why they still show some green). I honestly like the results. I love the way the dark veins show through the minty green leaves. Nice depth and detail. I even like the way the background leaves lack the green color. It looks like shadows and highlights. Nice contrast.
 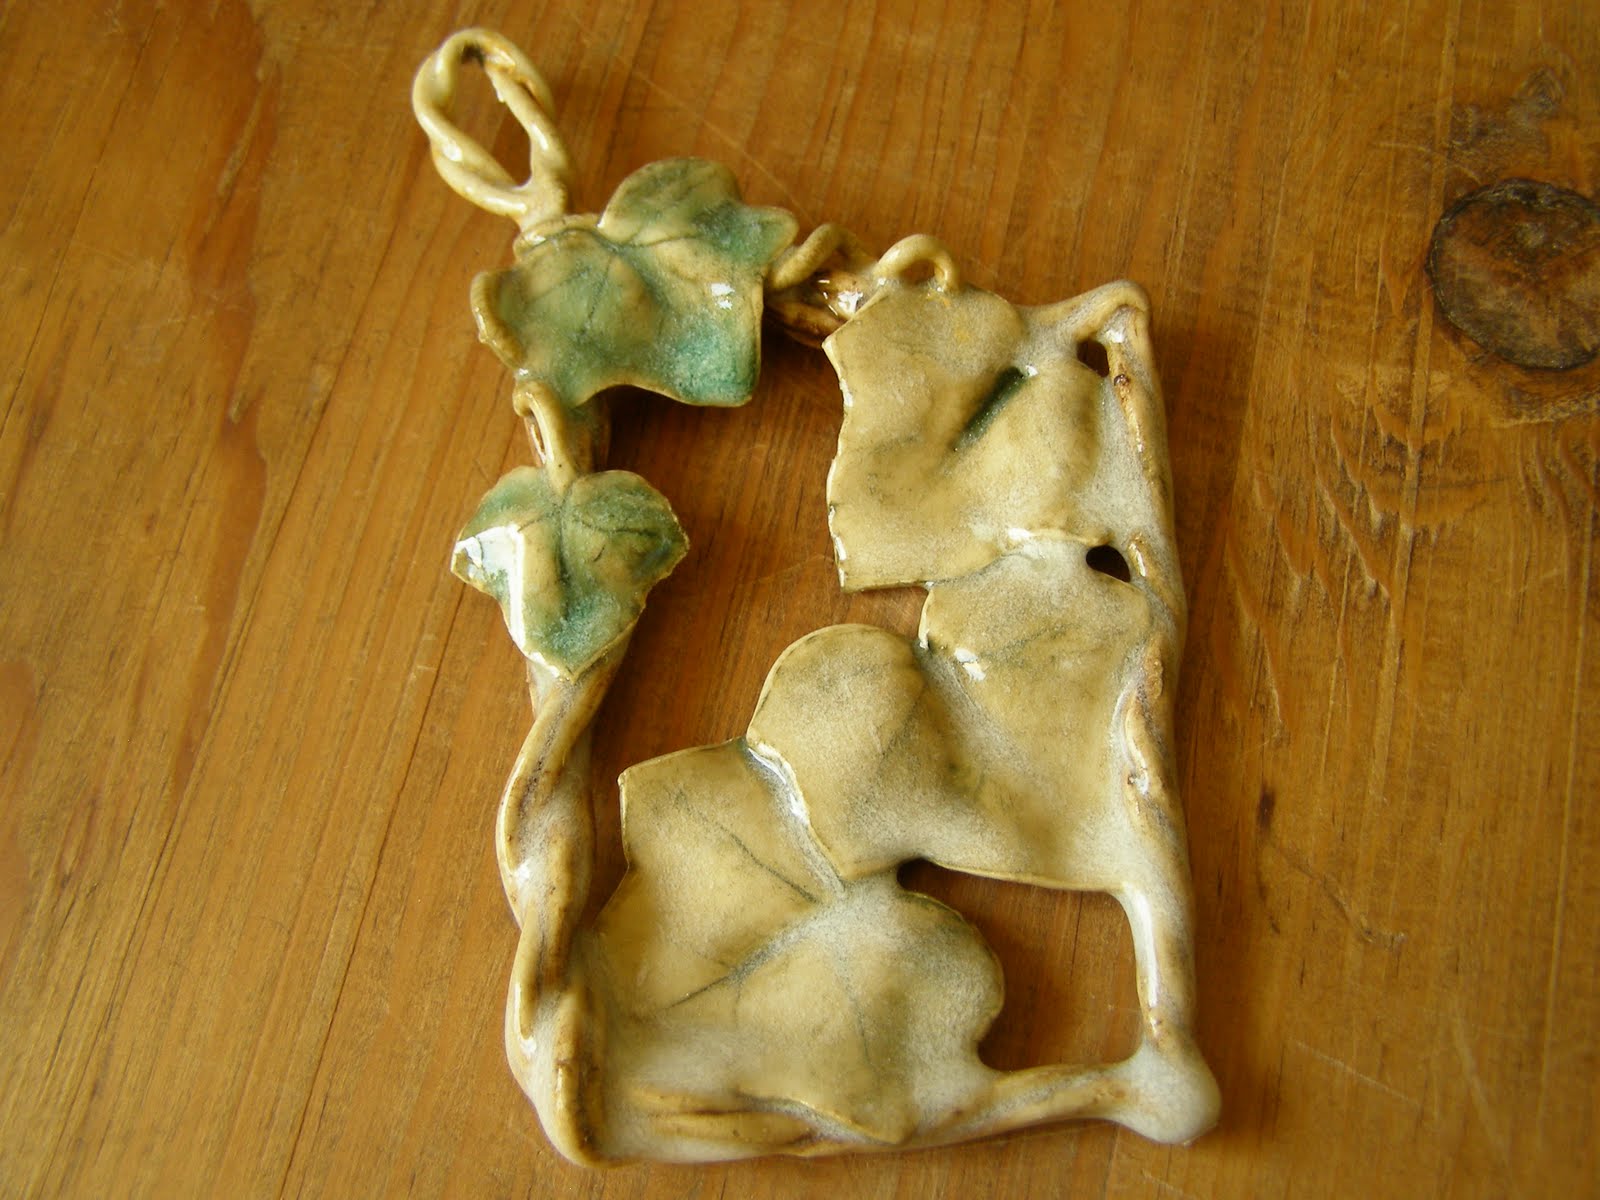 The next ornament in this series of tests had my favorite dark green underglaze, a dark brown underglaze, and a buttercup mason stain. Then I glazed the whole thing. Umm, no good. I do not like the results at all. This one will go in the shatter pile. I applied the glaze a little too thickly, but I think the main problem actually was with the cooling of the kiln. I slowcooled really well and that allows crystals to develop within the glaze. Depending on the exact glaze, sometimes the glaze turns a softer matte tone, sometimes large flower-like crystals develop, and other times it does as it did here. Partly due to the heavy application, it developed a heavy frosty appearance that obscured details. Not to my liking.
  This ornament has the same underglazes applied, but I did not apply any glaze, just fired it dry. I really like it like this. It's hard to tell in the pic, but the frame is done in the dark brown underglaze and I used the buttercup mason stain on the vine. Although there is only a subtle difference, I like the way it adds just a touch of depth and color.
 I did a similar experiment as the ornaments above with these two pendants, except my contrasting color was a cobalt/frit mixture. You can still see the frosting effect and a little loss of detail on the glazed pendant, but because the application wasn't quite as thick, the final effect is a little better. I still like the unglazed pendant better, but I can work with the glazed one too. It's nice and different. I probably won't be using this glaze on a slow cool on small items anymore.
  For now, I just want to share one more item. I really love this ornament! It is one of my favorite pieces from this firing. I have applied a combination of succesful effects to create an overall beautiful ornament. I applied sbred slip (and washed back) all over. Then I carefully applied the cobalt/frit mixture to the ribbon and bow. Next, I glazed the leaves and applied copper carb/rutile mix to them. The results include lovely accented veins showing through the minty green leaves. Also, the ribbon and bow exhibit the soft-glaze effect that I have mentioned in previous blogs caused from the frit reaching the melting point and becoming glaze-like.
Overall, this firing had some nice pieces. I lost a few more to the over-frosty effect from slow cooling and lost a beautiful large tray from bits of kiln wash falling into the glaze. I love some of the other pieces that I have run out of time to share, but will be listing them on my etsy site within the next week or two.
Also, as a side note, I have joined the Homefront Team on Etsy and created a nice treasury featuring some of the sellers.
I hope you enjoy browsing through them as I did when I created the treasury. These are all talented individuals that have some connection to the military. I love the bracelet by CandJjewelry. She incorporated a button from the Army uniform. So cute!
Saturday, July 10, 2010
Working in the Right Direction
On last Thursday, I had one of the most successful^6 firings ever! I had loaded the kiln with a lot of little stuff and just a few medium pieces. There were a lot of new designs and new finishes. I was so excited that I listed many of the new pieces on etsy just as fast as I could. Here, though, I want to share a little about some of the other pieces and also some of the techniques that I used. (This will either be one very long blog, a couple of not-quite-so-long ones, or I won't get everything shared... or some combination thereof.)
 This is one of my favorites and will be a (typically, late) birthday present to my dear friend Jeannette. I am thrilled with the results! I began this one with an impression from part of a stamp. I have a small handheld extruder that I used to create the very smooth vine-coil. I work with these tiny extrusions with damp hands because they dry out very easily. I also wedge a little extra moisture into the clay so it is very soft which allows me to create very supple curls and vines. I designed the vine to act as a bail for attaching to a necklace and added some of those babydoll ficus leaves that I've been enjoying lately. After bisquing, I applied a strong mix of cobalt carb with frit 3134 and washed it back a little . A little dark green underglaze added color to the leaves. I actually didn't apply any glaze, but apparently I exceeded the melting point for the frit because it added a lovely light glaze. This little beauty was fired to 2190`F in an electric kiln, with a slow rise the last 200` and a 20 minute hold at the top plus a controlled downfiring to 1400` resulting in a soft ^7 (the ^7 cone's tip was just barely touching the shelf).

 I've chosen this necklace to place my pendant on. This is one of the ones that I created in Rhode Island. I love the alternating herringbone stitch sections with the netting stitch sections. The cobalt blue (lapis azuli gemstone) intermediary beads work well with the ceramic pendant and the chocolate cherry seed beads create a nice, warm contrast. I am also very pleased with the toggle and loop closure. I love the way I stitched the netting over the gemstone bead. I originally had in mind a totally different art-bead idea when I created the necklace, but when I placed this pendant next to this necklace, they looked right. I really hope Jeannette likes it and finds an occasion to wear it.
 Although I was looking for bolder colors, I am also pleased with this fall tone pendant, although I am unsure exactly why it turned the colors that it did. I created this piece using coils from the handheld extruder again, extra soft clay, moist hands, etc. and added the tiny oak leaves. After bisquing, I applied a mason stain (buttercup yellow) mixed with frit 3134 to the whole piece and washed it back. Then I applied a dark green underglaze to the leaves only. This is the part that I'm confused about. I think there's a chemical reaction between the mason stain and the underglaze. I think the mason stain is iron-based (to get the yellow and also because when I combine this underglaze with other iron-based underglazes the same thing happens), the green color burned out leaving a nice iron-brown.

 Anyway, back to the pendant and the necklace that I will be incorporating it into. The gold and reddish brown tones look wonderful with this necklace: The pendant is designed to have the necklace woven through the braided portion. I could even add a small briolette if I wanted to (and may in future pieces), but this one I will simply work with the seed beads.
I have been working for some time on some jewelry ideas. My first batch of pendants didn't result in very many coordinating with the necklaces that I had made. I needed bolder colors. I was a little more successful this time.
This is one of my favorites and will be a (typically, late) birthday present to my dear friend Jeannette. I am thrilled with the results! I began this one with an impression from part of a stamp. I have a small handheld extruder that I used to create the very smooth vine-coil. I work with these tiny extrusions with damp hands because they dry out very easily. I also wedge a little extra moisture into the clay so it is very soft which allows me to create very supple curls and vines. I designed the vine to act as a bail for attaching to a necklace and added some of those babydoll ficus leaves that I've been enjoying lately. After bisquing, I applied a strong mix of cobalt carb with frit 3134 and washed it back a little . A little dark green underglaze added color to the leaves. I actually didn't apply any glaze, but apparently I exceeded the melting point for the frit because it added a lovely light glaze. This little beauty was fired to 2190`F in an electric kiln, with a slow rise the last 200` and a 20 minute hold at the top plus a controlled downfiring to 1400` resulting in a soft ^7 (the ^7 cone's tip was just barely touching the shelf).
 I've chosen this necklace to place my pendant on. This is one of the ones that I created in Rhode Island. I love the alternating herringbone stitch sections with the netting stitch sections. The cobalt blue (lapis azuli gemstone) intermediary beads work well with the ceramic pendant and the chocolate cherry seed beads create a nice, warm contrast. I am also very pleased with the toggle and loop closure. I love the way I stitched the netting over the gemstone bead. I originally had in mind a totally different art-bead idea when I created the necklace, but when I placed this pendant next to this necklace, they looked right. I really hope Jeannette likes it and finds an occasion to wear it.
 Although I was looking for bolder colors, I am also pleased with this fall tone pendant, although I am unsure exactly why it turned the colors that it did. I created this piece using coils from the handheld extruder again, extra soft clay, moist hands, etc. and added the tiny oak leaves. After bisquing, I applied a mason stain (buttercup yellow) mixed with frit 3134 to the whole piece and washed it back. Then I applied a dark green underglaze to the leaves only. This is the part that I'm confused about. I think there's a chemical reaction between the mason stain and the underglaze. I think the mason stain is iron-based (to get the yellow and also because when I combine this underglaze with other iron-based underglazes the same thing happens), the green color burned out leaving a nice iron-brown.
When I combine this same underglaze with a blue (cobalt?) based mason stain, the green (copper?) of the underglaze doesn't burn out. Due to the fact that I don't understand the why, I must simply accept and remember the results and apply my finishes accordingly. I would like to find a green that I can combine with the yellow mason stain at some point, so I'll keep working on it...
Anyway, back to the pendant and the necklace that I will be incorporating it into. The gold and reddish brown tones look wonderful with this necklace: The pendant is designed to have the necklace woven through the braided portion. I could even add a small briolette if I wanted to (and may in future pieces), but this one I will simply work with the seed beads.I have so many more great results that I want to share, but, hopefully, I will share them in another post. I have some ornaments that I want to add beads to, another necklace that is more complicated, some lovely sleepy-sepia tone ornaments that I will add some reed handles to, and a few other things.
Plus, I am still working in the direction of pendants and ornaments. I always have ongoing ideas that combine working theories and add new adaptations. I think I need to get back to work, but I look forward to sharing more later.
You can also visit my etsy shop (http://www.jaritascreations.etsy.com/ ) to view the ornaments and pendants that I have already listed.
Thursday, July 8, 2010
Free Gift Tags!!!


It's early this morning, but I impatiently waited for the kiln to get cool enough to pull out some of the gift tags so I could take pics. Even then, I had to handle them with tongs and a potholder because they were too hot too handle at first, but I've got the pics of the finished item!!!
These gift tags are so sweet! I honestly love them! I think they are the perfect "thank you" for selecting pretties from my etsy shop. In case you haven't heard yet, this is the deal...I am participating in a Christmas in July promotion on Etsy and the Etsymudteam. My "special" was up to me to choose. I spent some time and brainstorming (there's a blog entry on that) and came up with the idea to give a free ceramic gift tag to any purchase totaling $15 or more. Yes, that's right! FREE CERAMIC GIFT TAG!!! 

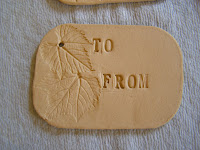
These cuties measure about 2.5" by 1.75". They are a lovely shade of forest green. I have fired them to ^6 (about 2190` F), but left them unglazed which allows them to be written on using a Sharpie-type marker. I impressed each tag with leaves, some are grape leaves, maple leaves, tiny oak leaves, or ornamental yew (for that holiday look). If someone prefers a specific leaf impression, please let me know and I will try to accomodate, but if all the ones made with that leaf have already gone out, I'll let you know.


These cuties measure about 2.5" by 1.75". They are a lovely shade of forest green. I have fired them to ^6 (about 2190` F), but left them unglazed which allows them to be written on using a Sharpie-type marker. I impressed each tag with leaves, some are grape leaves, maple leaves, tiny oak leaves, or ornamental yew (for that holiday look). If someone prefers a specific leaf impression, please let me know and I will try to accomodate, but if all the ones made with that leaf have already gone out, I'll let you know.


 I also pulled a couple of my new beads out of the kiln already. I will write another blog on them over the next couple of days, but here's a sneak peek at a few:
Well, I've got to get moving on listing all my new items in my etsy shop! I have so much to share! You can visit my shop at http://www.jaritascreations.com/
Wednesday, July 7, 2010
Merry Christmas in July!
My perspective on Christmas has fluctuated throughout my life. I have always believed in the true reason for the season and assure that I remember Him even in the little details like spelling Christmas starting with "Christ" and never spelling it as Xmas. I understand wishing people "Happy Holidays" to recognize that the entire season includes Christmas and other holidays too, but I usually wish people "Merry Christmas and Happy Holidays" to recognize my personal emphasis on Christmas. These things have remained throughout my life; it's more my activities, how I react, and the more complex perspectives that have changed. When I was a young adult and the kids were little, I didn't really think about Christmas until sometime in November and then it all hit me at once with lots of excitement and fun activites. It was a busy, hyper, oft-confusing and overwhelming season. When I had the flower shop, I planned for Christmas months in advance, but never for myself. Christmas became a time when I tried to create a mood, to build upon people's love for each other, and to share in others' celebrations. It was a time when I became almost completely unaware of myself and any personal recognition of the holiday season. Then, as my children reached young adulthood, Christmas almost became lost in other activities. Last year, we didn't even set up a tree. Christmas dinner was not too grand. There were only a few presents, although we did go after-Christmas shopping. There were just too many other things going on.
 My heart ornaments are a perfect example of the emphasis on love, but even here I also focused on life by including the tiny little leaves. These ornaments will truly display lovingly around the holiday time, but what I really like about them is that they can also be displayed throughout the year for multiple purposes. They would hang nicely in the kitchen on that skinny section of wall where most people hang their potholders, or in the bedroom in that small space next to the closet. They would be adorable decorating a wedding or even a baby present. And wouldn't it be cute to hang one on a suction cup hook at the office? These precious ornaments can serve to remind us of love and life throughout the year and at Christmastime.
 My "Tree of Life" ornament obviously celebrates life, but it also celebrates my love for nature, my appreciation of the gifts that we have all around us. It, too, can be displayed along those little places where we could use a little positive influence, a little reminder of the holiday season throughout the year without looking so much like we simply forgot to pack up last year's ornaments.

This year, I began thinking of Christmas way before July even. I think that's more how I want it to be. I like thinking about the positive feelings inspired by Christmas throughout the entire year. It's partly that thought process and perspective that inspires my current line of ornaments. My themes are life and love, which, to me, are important throughout the year and highly emphasized during the holidays.
 My heart ornaments are a perfect example of the emphasis on love, but even here I also focused on life by including the tiny little leaves. These ornaments will truly display lovingly around the holiday time, but what I really like about them is that they can also be displayed throughout the year for multiple purposes. They would hang nicely in the kitchen on that skinny section of wall where most people hang their potholders, or in the bedroom in that small space next to the closet. They would be adorable decorating a wedding or even a baby present. And wouldn't it be cute to hang one on a suction cup hook at the office? These precious ornaments can serve to remind us of love and life throughout the year and at Christmastime.
 My "Tree of Life" ornament obviously celebrates life, but it also celebrates my love for nature, my appreciation of the gifts that we have all around us. It, too, can be displayed along those little places where we could use a little positive influence, a little reminder of the holiday season throughout the year without looking so much like we simply forgot to pack up last year's ornaments.
My little birdhouse ornaments epitomize all that I have already shared here. The love of life and the joy of sharing it throughout the year, while being able to comfortably and attractively display the positive sentiments of the holiday season and maintaining a suitable decor all year long.
To me, Christmas-in-July is not just a time for early preparations for the holiday season, but also a time to stop and think about all the warm and loving feelings that Christmas brings into our lives. This is the season to refresh those feelings and feel good about ourselves and those we love!
I have enjoyed reflecting upon Christmas as I have prepared for a Christmas in July promotion being held throughout Etsy, the Etsy Mud Team, and within my shop. Many other members of the EtsyMudTeam have also been working to help you prepare for a joyous and festive holiday season. To view the entire list of participating members, please visit the MudTeam website at http://www.etsymudteam.craft-sense.com/ . Or if you choose to visit the Etsy main website ( http://www.etsy.com/ ), you can search for "christmasinjuly" to see lots and lots of neat, handcrafted Christmas items.
Friday, June 25, 2010
Something Special in My Etsy Shop for July
Ok, I admit it...marketing is not my favorite part. But, the etsymud team (and actually etsy in general) is working on a Christmas in July promotion and I've decided to join in since I was already working on small things like ornaments and such. The etsymudteam's promo starts July 8th. I will be featuring my work in a showcase in the Ceramics and Pottery category. I haven't yet decided what my "special" will be...hmmm...what about including a small gift like a ceramic gift tag with total shop purchase over $10-$15? I like that idea! Gift tags are reasonably simple to make and can be written on with a fine tip Sharpie. They are small enough that I can include them in the packaging without a lot of extra expense. I definitely like the idea!!!
 After starting this blog and coming up with the gift tag idea, I hurried out to the studio and created some! They're not very complicated, just simple little tags. The finished size should be around 1.75" x 2.75". I will bisque them, apply a frit/stain wash and fire to ^6. They will be as durable as high-fire, but because I will leave them unglazed, they will still be able to be written on with a Sharpie type marker.

 After starting this blog and coming up with the gift tag idea, I hurried out to the studio and created some! They're not very complicated, just simple little tags. The finished size should be around 1.75" x 2.75". I will bisque them, apply a frit/stain wash and fire to ^6. They will be as durable as high-fire, but because I will leave them unglazed, they will still be able to be written on with a Sharpie type marker.
 I will offer one free for any purchase over $15 in my etsy shop from July 8-31. If anyone buys multiple items over $15 each, then I will include a free gift tag for each, but if someone buys multiple items that only come up to or just over $15 together, then I will only provide one free tag.
The promo starts in about 2 weeks and I better get busy! I this this is a good marketing idea, but I still need to make them, let them dry, make enough other stuff to justify firing, do a bisque-fire, apply finishing techniques on these and enough other stuff for firing again, then do the final ^6 firing. Plus, I still need time to get everything listed! Hmmm, I'd better get focused and moving! I'm excited and looking forward to Christmas in July!
BTW, there's still other stuff that I wanted to blog about like an interesting firing that I did yesterday, but I need to prioritize my time, so the other sharing will have to wait. Sorry, maybe I'll tell ya'll about it when I take a break from creating, but for now, off to the studio!!!
Friday, June 4, 2010
Life is good and busy!
Well, summer weather is officially here with a vengeance. I had been working most of the month of May on gardening and incorporating new critters into my world. I have added 22 chickies, 6 ducks, and 2 goats! Between those and planting 63 blueberry plants, 25 lingonberries, 24 raspberries, 12 blackberries, 40 strawberries, some corn, lots of assorted veges and a few flowers, I haven't had much time for pottery. Although my hobby farm still has a lot more work to be done, the heat and humidity have reduced the amount of outdoor time. Now, I am hoping to spend more time on my pottery.
 On this set, I used an Amaco Velvet Underglaze wash on bisque then fired to cone 6. The colors are very soft and delicate, almost powdery looking, like they belong on an enchanted creature. I like them a lot, but my necklaces are bolder and earthier.
 The ones pictured here, though, I mixed mason stains with Frit 3134 and then washed back. The frit created an unexpected luster! I love it! I will be working more with mason stains and frit 3134 to create a wider color palette. Hopefully my next batch will color-coordinate better with the necklaces that I have already made.


At the end of April, I had fired a load that I forgot to blog about. It was mostly the pendants intended to go with the necklaces that I had worked on while in Rhode Island. Overall, the pendants turned out lovely, but I don't think they are going to work with the necklaces:-( The colors of the pendants are too soft, too pastel. I will be listing most of them for sale on my etsy page soon as individual pendants. (Listing new items has been very limited due to my farming activities.)
 On this set, I used an Amaco Velvet Underglaze wash on bisque then fired to cone 6. The colors are very soft and delicate, almost powdery looking, like they belong on an enchanted creature. I like them a lot, but my necklaces are bolder and earthier.
 The ones pictured here, though, I mixed mason stains with Frit 3134 and then washed back. The frit created an unexpected luster! I love it! I will be working more with mason stains and frit 3134 to create a wider color palette. Hopefully my next batch will color-coordinate better with the necklaces that I have already made.
These were supposed to turn out more purple, but in addition to the luster, the frit also created a chemical reaction that resulted in a nice bluer tone. I truly like it, and will create necklaces to coordinate, but my first batch of necklaces did not include this tone. I also intend to create additional necklaces that work better with the other pendants that I now have. It's all an ongoing, learning-while-playing process.

In the meantime, I have found some time in the past week to go play in clay. I am still wanting to work on the jewelry, but I have found that it is impossible to run a full kiln with only itty bitty jewelry components. I would need hundreds, if not thousands, to fill up the kiln! So, I still created some new pendant designs that I love, but I also worked on some new birdhouses.
I love birdhouses! I have made many and even sold a few. My designs are always changing so each batch comes out differently. My last batch was designed using Laguna SBRed clay because I wanted a nice woodtone and the SBRed comes out a very warm brown. They are gorgeous, but almost too dark. So this time, I have altered the design. Firstly, I am now working with Laguna BMix5 which is a white porcelaineous stoneware and I will be applying the SBRed as a washed slip, but I have also changed the actual design a little.

Before, I designed the lid to look wooden with the leaves settling on top. Now, I have the leaves layered to create the whole lid. An improvement or simply a difference? I don't know, but I like the way it looks with this clay. I intend to make a few more birdhouses, although each one will still be a "OOAK" because they are designed individually with their own leaves and character. The two that I made this week were designed with grape leaves because I am fascinated with the detail and texture in the grape leaves. I want to create some more birdhouses using different types of leaves too and also in different sizes.

I am looking forward to finishing all these up and hopefully having new items listed on etsy soon. I will only be displaying my pottery at one craft show this year, the Ft Leonard Wood Spouses Club's annual fall show, just like in past years. I am aiming to have a significant display of new birdhouses, jewelry, and ornaments this year along with bringing back previous work.
Hmmm, my choice of creations don't exactly bring about a unified theme...I'll have to think on that. I know these are the items that appeal to me to make right now. I have reached a point in my life and my artwork that is more focused on "me" than I have ever been before. Although my husband has always spoiled me, I have always been somewhat self-sacrificial, often defering or adapting my desires for others. With my children grown and living their own lives now and with me being out of the standard workforce, I have found a freedom that I have never previously enjoyed fully. I am doing more of what I want to do and not so much of what I feel pressured to do. In relation to my artwork, this means that I am making what I feel like making whether it is a unified theme or not. It may not be the best business direction, but I am enjoying what I am making and that joy always shows in my creations. I still have the leaves as an overall theme. I will just have to figure out how to display the varied items in an attractive manner. I believe I can make it all work out. I truly love my pottery and my world! Life is good!
Subscribe to:
Comments (Atom)